
Years ago, I got a cordless power tool kit from Canadian Tire that consisted of: 5 ¼” circular saw, a 3/8” drill / driver and a flashlight. They were the Canadian Tire house brand: Mastercraft. The kit also included a pair of 1.5Ah NiCd battery packs and a charger with wall adapter. The tools worked great, but as it goes with NiCd batteries, after a while the tools would need to be recharged more often and would self-discharge overnight. If I wanted to use these tools, I would need to leave the battery pack in the charger overnight, then put the second battery in the charger while I used a tool. The tool would quickly run out of power and I would need to swap battery packs. After a while this became tedious and I decided it was time for an upgrade!

When I opened one of the tools up, I noticed that they seem to be well made. Likely the reason that they have lasted me as long as they have. However, the NiCd packs were no longer available and the new Mastercraft tools now included 20V Lithium batteries that have a different shape that won’t fit into the old NiCd powered tools.

My thought was to replace the NiCd batteries in my existing packs with Lithium batteries. I did have some really good cells that I had harvested from old laptop battery packs, so I wanted to use those. What I needed was a BMS board to go inside the old tool battery packs that would protect the batteries.

Batteries were hot glued together
Searching on Amazon I found this board: https://www.amazon.ca/gp/product/B07DRKMVKJ/

This is a protection board for a 5 series Li-ion battery pack that provides overcharge / over-discharge and short circuit protection. It can provide up to 20A to the load. It even has a thermistor that you could tape to one of the batteries to prevent overheating the pack. It was ideal for this application!
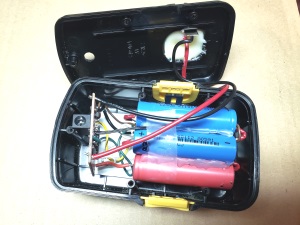
Opening one of the Mastercraft packs and removing the old NiCd batteries I found a huge space that would provide plenty of room for the 5 replacement 18650 cells. The replacement batteries are Lithium cells with an 18650-form factor (i.e.: 18mm diameter by roughly 650mm length). I arranged the cells and simply hot glued them together in a way that would make them easy to wire.

With the NiCd batteries removed, I could see that they the battery pack’s terminals were being held in place by the NiCd batteries themselves. Without the batteries the terminals would have no support. I needed something to hold the terminals in place now that the NiCd batteries were removed. My solution was to solder a red / black wire to the +/- terminals, push the terminals in place and then encase them with hot melt glue. This works very well! It holds the terminals in place and provides strain relief for the wires.

Next the protection board needed some work. It had metal connectors on the top side and on the bottom it had some short lengths of wire attached. I guess that in some applications these connectors may be useful, but for what I wanted they would have to be removed. I started by de-soldering and removing the metal clips that were on top of the board. Then I removed most of the wires from the bottom of the board, but I left the red wire since I thought this one could be used in my new configuration. I also left the barrel connector on the top of the board, since my intention was to use it for charging my new pack.

Wiring the protection board is straight forward: Two wires go to the load (ie: the battery pack’s terminals) another 2 wires to the batteries +/- 18V. This board also needs connections to each battery in the pack to be able to check the voltage on each battery. Here is a diagram of all the connections.

The protection board does have labels on the top and bottom sides showing were all the connections go. Just solder your wires to the correct pads on the board and then to each battery in your pack. When you are done you can check your work with a voltmeter.
Connect the common of your meter to the pack’s negative (B-) and then check each connection:
- B1 should be ~ 3.7V,
- B2 should be ~ 7.1V,
- B3 ~ 11.1V,
- B4 ~ 16.8 and
- B+ should be ~ 18V.
The battery terminals should be connected to P+ (positive) and P- (negative). If everything checks out go ahead and start re-assembling your new pack.

I was lucky that the lithium batteries fit snugly into the Mastercraft battery housing. You may need to shim your batteries with cardboard or similar to prevent them from rattling around in your case. I was also lucky with the protection board. I wanted to have it standing up in the battery pack case with the barrel connector facing up. I only needed a small piece of cardboard under the PCB to make it fit nicely.

The last thing I needed to do was to measure carefully the position of the barrel connector on the PCB within the case. Then I transferred that measurement to the top of the case and drilled a hole. This hole will allow access to the barrel connector once the case top is screwed into place. Here is photo with the battery pack all assembled. Notice the hole in the deck of the case. When the pack is installed in a tool that hole will be hidden by the tool’s base.

To charge the battery I will need to remove the battery from the tool, so that I have access to the hole and barrel connector. To charge the pack you need a 21V DC power source. I plan to use my SkyRC iMax B6 charger: https://www.amazon.ca/ORIGINAL-Charger-Balancer-Lithium-Battery/dp/B00HED90RU . This charger is ideal for charging lithium batteries and it will provide a loud beeping sound when the battery is fully charged. That will work great in a noisy workshop!
Now my battery pack with its lithium batteries has a 2 Ah capacity which is greater than with the original 1.5 Ah NiCd’s. No more self discharging or memory effect worries. As an added bonus, the battery pack is now less than half the weight! With the NiCD batteries the pack weighed 855g, but now with the lithium batteries it weighs in at 399g. This is going to be great, because it will make the overall tool lighter and help reduce fatigue when using it. This all means that I get to work longer and spend more quality time in my workshop!
I’ve always been making things. My favorite class in grade school was shop! In High School my elective was Industrial Arts. Afterwards I went on to study Electrical Engineering and when I graduated I started working in hardware development at a small company. Making and creating things is something I grew up doing!
Thanks for the great article. I have the same issue with my C Tire Power tool set. Quick question, do you also need to solder all of the batteries in series…. or is the wire connection from each battery to the protection board sufficient? Thx
JM
Hi JM, thanks for your feedback! Looks like I don’t have a clear picture of how the batteries are wired together. I’ll have to update this article with a better photo.
Yes, in addition to the sense wires to the BMS board you will need to also connect the batteries in series. The sense wires are thinner (smaller gauge) because they don’t carry current, they are used by the BMS board to monitor cell voltage of each cell.
If you look at the last few photo’s in the article you will notice that there are short lengths of thick red wire between the cells. The thick red wires are the series connection between the cells and will carry all the current to the load (power tool). Sorry, its kind of hard to see in the photos. Also hard to see in the schematic that you see mid article. There are lines between each cell to indicate a series connection of the cells.
Thanks! I will be gathering the materials over the next couple weeks and then attempt to put it together! A few pics of the assembled battery would be fantastic when you have a chance. I will let you know how my battery turns out!
Thx
JM
How did it turn out???